|
Diva Crochet |


|
Generic Knitting Board Instructions The instructions will be available as a free pdf download. Check back soon. Thanks for your patience! |

|
· Lay the board in front of you or hold it in your hand. If you're right-handed, hold the board in your left hand and wrap the yarn with your right hand. If you're left-handed, hold the board in your right hand and wrap the yarn with your left hand. · See diagram below. Work across the board from left to right, starting at knitting peg 1 and ending at knitting peg 30. (Your board may have more pegs or fewer pegs. Follow the diagram below and substitute your peg/nail count below.) Ignore the knitting pegs on each end of the center hole in the photo below. These extra pegs are called Rounders and are only used when Round Knitting on a rake or frame board. Your board may or may not have these extra knitting pegs. This stitch will only use the 15 knitting pegs on the upper board and 15 knitting pegs on the lower board. · Start by pulling the yarn from the center of the skein of yarn. |
|
· Worsted Weight, 4 ply yarn. Red Heart is a good yarn for beginners. · A steel crochet hook to lift stitches size 2, 3, or 4. You can also use your fingers instead of a hook or other knitting board or round loom tools. · Scissors (not included in kit) |


|
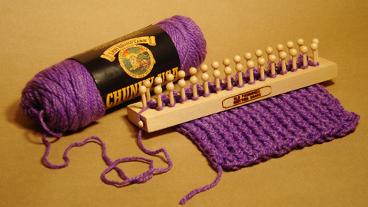
The board featured at the left is a rectangular rake or frame board. Your knitting board may look different from this board. It may have nails instead of pegs. This board has 15 pegs on the lower board and 15 pegs on the upper board and two extra Rounder pegs for a total of 32 pegs. Your board may have more nails or pegs OR it may have fewer nails or pegs. It doesn't matter! Follow the directions below and substitute your nail or peg count. |
|
The nails or pegs are called knitting pegs. The way yarn is wrapped around the knitting pegs, called windings, makes the knitted stitches.
The two extra end pegs on the top of the knitting board above make it unique and special. These pegs are called Rounders, and won't be found on most rake or frame boards. Rounders allow you to use a rake or frame board like a round loom. This type of knitting board is more versatile because you can use stitches previously meant for round looms on a rake board. It gives you the ability to include more stitches for your projects.
The small pegs on the side ends of the board are called end tie-off pegs. These pegs hold the yarn taut while you lift stitches to knit. Some boards may have slits in the board to hold the yarn or thumbtacks. If your board doesn't have some way to hold the yarn, insert thumbtacks into your board or consider purchasing a board with end tie-off pegs.
Once you learn knitting board basics, you can apply these same techniques to any knitting board, round loom or spool. The basics are all the same. We'll start with a traditional rake or frame stitch. In knitting lingo, this is actually a ribbed stitch, knitting and purling at the same time. It's proper knitting name is the crossed-ribbing stitch. In knitting board lingo, this stitch is commonly referred to as the Figure-8 stitch. This type of knitting is sometimes called double knitting, because it looks the same on the front of the work as the back. You can't double knit on a round loom. You can only double knit on rake or frame boards. |
|
The Old Fashioned Knitting Board |

|
To be continued… Thanks for your patience! Will be available as a free pdf download. |